I wanted to set up a technical blog free of charge. A quick search on the world wide web shows that building technical blog using GitHub Pages seems to be a popular option. This post demonstrates how this blog site was built on Windows using GitHub Pages, Jekyll, and Gitalk.
Preparation
I have used GitHub before but know very little about web development. This post should be suitable for readers with a similar background.
Method
This blog is essentially a GitHub repository, where some of the repository’s features are transformed via GitHub Pages, Jekyll, and Gitalk to become features of a blog site. GitHub Pages is a static site hosting service that can host webpages from a GitHub repository. Jekyll is a static site generator that, when used with GitHub Pages, serves to update all the pages on the blog every time a commit to the associated repository is made. Gitalk is a comment plugin based on the “Issues” section of GitHub repositories.
1. Create a repository
Create a GitHub repository and name it using the format username.github.io.
E.g., if username is steve-rogers, the repository name should be steve-rogers.github.io.
2. Set up GitHub Pages
On the repository page, go to “Settings” and then “GitHub Pages”. Choose a theme and follow the instructions. When done, the GitHub Pages should be published at https://username.github.io/ (e.g., https://steve-rogers.github.io/). This is also the url of the blog site to be built.
3. Clone the repository locally
Clone the repository to a local folder.
The next two steps enable launching the blog site for local preview (shown in step 10) before pushing it to GitHub.
4. Install Ruby
Download and install Ruby with devkit here. Settings in this blog works with rubyinstaller-devkit-2.6.3-1-x64.
5. Install Jekyll
Open cmd. Type gem install jekyll.
E.g.,
C:\Users\steve> gem install jekyll
When the installation is done, type jekyll -v in the cmd; if the jekyll version shows up, the installation is successful. E.g.,
C:\Users\steve> jekyll -v
jekyll 3.8.5
6. Download a Jekyll theme
-
Choose a jekyll theme from here and download it.
To download the theme, one may click “Download” directly, or click “Home” to go to the GitHub page of the theme and download the theme’s repository from there. The latter option provides the latest version of the theme.
This blog uses the Cool Concise High-end theme; its latest version is here.
- Go back to the local repository created in step 2 and delete all files except for the hidden
.gitfolder. - Copy all files from the jekyll theme folder just downloaded to the local repository.
At this step, if one follows step 10 and launches the blog site locally, the blog site would look the same as the jekyll theme demo if they downloaded the theme from the jekyll theme website, or the blog of the theme owner if they downloaded the theme from the owner’s repository.
7. Customize theme parameters
The jekyll theme is like a blog site template. One may customize the template by filling in their own user information, such as blog title, GitHub username, and email address in the blog site’s main page, header, footer, etc.
8. Set up Gitalk
The theme template this blog uses has a comment feature that uses Disqus. I modified the template to use Gitalk instead. Here’s how to do it.
-
Register an OAuth application here.
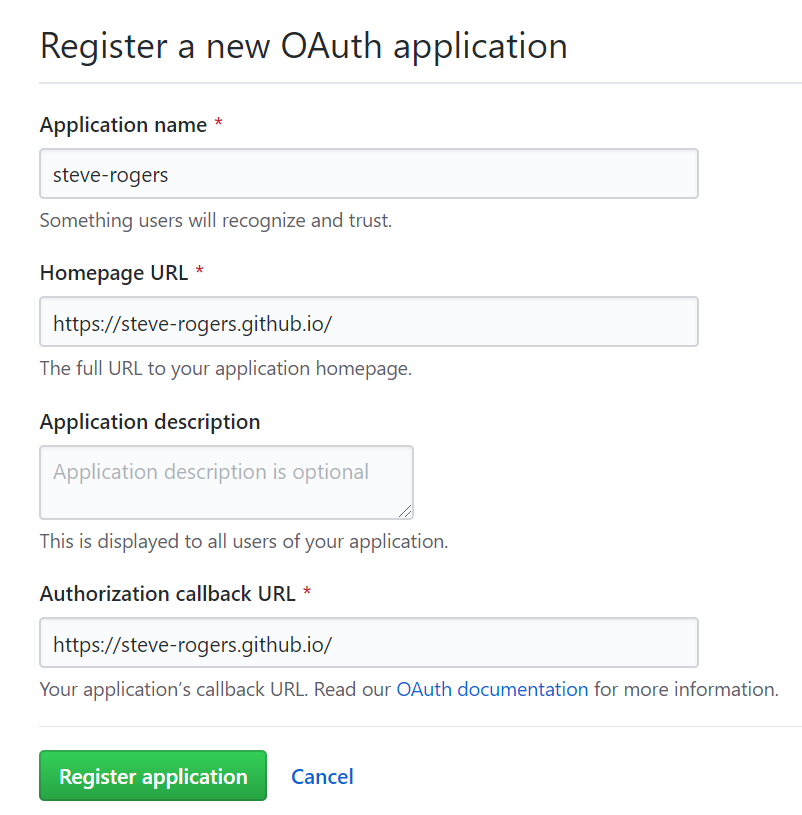
“Application name” is the name of the blog site’s GitHub repository. “Homepage URL” is the url of the blog site. “Authorization callback URL” is the same as “Homepage URL”. E.g.,

Note down the client id and the client secret key.
-
Paste the following code at the end of the pages where the comment sections are to be placed (if necessary, comment out all the Disqus containers first). Then customize the Gitalk parameters by filling in one’s own information.
 <!-- Gitalk comment start  -->

 <!-- Link Gitalk  -->
 <link rel="stylesheet" href="https://unpkg.com/gitalk/dist/gitalk.css">
 <script src="https://unpkg.com/gitalk@latest/dist/gitalk.min.js"></script>
 <div id="gitalk-container"></div>     <script type="text/javascript">
     var gitalk = new Gitalk({

     // Gitalk parameters
         clientID: 'xxxxxxxxxxxxxxxxxxxx', //customize
         clientSecret: 'xxxxxxxxxxxxxxxxxxxxxxxxxxxxxxxxxxxxxxxxx', //customize
         repo: 'steve-rogers.github.io', //customize
         owner: 'steve-rogers', //customize
         admin: ['steve-rogers'], //customize
         id: window.location.pathname, // leave this line as it is

     });
     gitalk.render('gitalk-container');
 </script>
 <!-- Gitalk end -->
E.g., I wanted to put a comment section at the end of each post and the “Archives” page. So I pasted the above code at the end of
/_layouts/post.htmland/page/0archives.html.
To view the resulting comment sections at this step:
-
Follow step 11 to push to GitHub.
Caveat. If the blog site is launched locally (as in step 10) without first being pushed to Github, a message like
 Related Issues not found.
 Please contact @username to initialize comment.
 Login with Github
would appear at the comment sections, and clicking on “Login with Github” would navigate back to the blog site at
https://username.github.io. - Wait for 30s and visit the blog site at
https://username.github.io/. -
Open each page with a comment section and click on “Login with GitHub” at the comment section to initialize issue comment. If this is the first time a comment is ever initialized at the blog site, a prompt for authentication may appear. Otherwise, it seems that opening the pages is enough.
This creates an issue for each page with a comment section at the blog’s GitHub repository. Any future comments on a page would become comments under the corresponding issue in the repository.
Caveat. The blog posts are generated from .md files in the _posts folder in the repository. The names of these .md files cannot be longer than 50 characters, otherwise an Error: Validation Failed error would occur at the comment sections. The reason is follows.
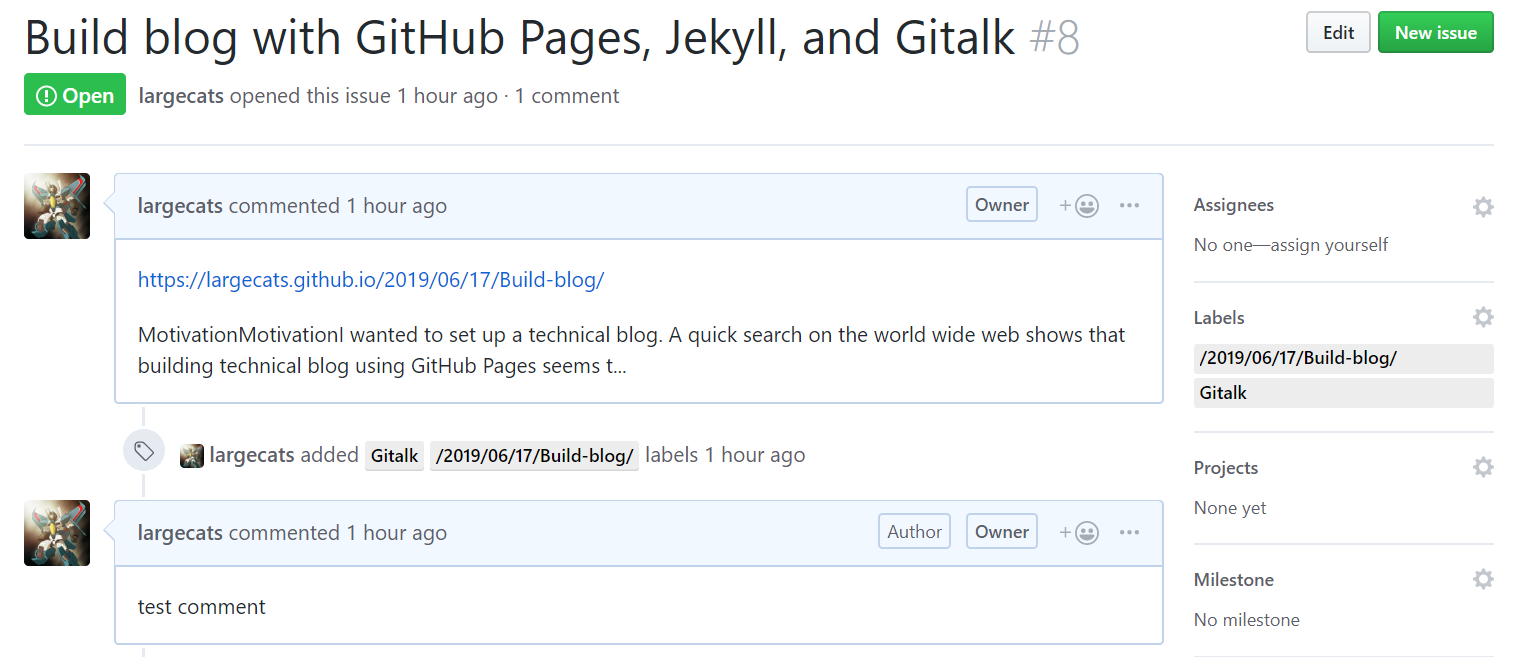
Each blog post is a page, and as Gitalk creates an issue for each page, the names of those .md files would become labels of the corresponding issues. E.g., this blog post is written in a .md file called 2019-06-17-Build-blog.md, and the corresponding issue has labels /2019/06/17/Build-blog and Gitalk, as shown below.

And 50 characters is the limit of GitHub issue label, as discussed here.
9. Write blog
As mentioned above, each blog post is generated from .md files in the _posts folder in the repository, with a header that looks something like this:
---
layout: post
title:  "Build blog with GitHub Pages, Jekyll, and Gitalk"
date:   2019-06-17
categories: life-saver
tags: github-pages jekyll gitalk windows
---

* content
{:toc}
Customize this header for each post. The rest is the same as writing in markdown.
10. Local preview
It is generally a good idea to preview the blog post before pushing it to GitHub, which would publish it at https://username.github.io/. Here’s how to do it.
- Open cmd.
cdto the local repository.-
Type
jekyll s.The output would look something like this:
C:\Users\steve\blog>jekyll s Configuration file: C:/Users/steve/blog/_config.yml Deprecation: The 'gems' configuration option has been renamed to 'plugins'. Please update your config file accordingly. Source: C:/Users/steve/blog Destination: C:/Users/steve/blog/_site Incremental build: disabled. Enable with --incremental Generating... done in 2.05 seconds. Please add the following to your Gemfile to avoid polling for changes: gem 'wdm', '>= 0.1.0' if Gem.win_platform? Auto-regeneration: enabled for 'C:/Users/steve/blog' Server address: http://127.0.0.1:4000/ Server running... press ctrl-c to stop. - Type
localhost:4000in browser to view the blog site locally.
If changes are made, save the changes and refresh the browser to view the updated blog site locally.
11. Push to GitHub
When the blog site is ready to be published, push the repository to GitHub. The blog site will be updated at https://username.github.io/ after about 30s.